A gallery wall is one of the easiest and most stylish ways to add personality and character to any room. Whether you’re displaying family photos, art prints, or a mix of both, a well-arranged gallery wall can instantly transform a plain wall into a stunning focal point. But creating one can feel overwhelming if you don’t know where to start. Don’t worry — we’re here to help! In this post, we’ll share simple, practical tips on how to arrange a gallery wall that looks balanced, cohesive, and beautifully curated.
Start by Choosing a Theme or Style
Before you start hammering nails into the wall, decide on a theme or style for your gallery wall. Do you want it to feel modern, vintage, eclectic, or minimal? Maybe you’re drawn to black-and-white photography, colorful abstract art, or travel memories. Having a clear vision will help you select the right pieces and frames, ensuring everything looks harmonious when arranged together.
Select the Right Wall and Layout
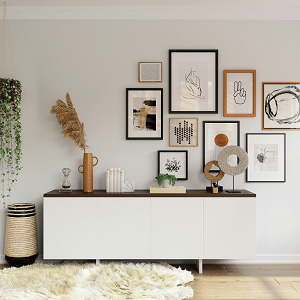
The best thing about gallery walls is that they work in almost any room — living rooms, bedrooms, hallways, or even staircases. Choose a wall that could use a visual lift or acts as a natural gathering point. Once you’ve picked the spot, decide on a layout. You can opt for a structured grid layout with frames evenly spaced, or a more organic, free-form arrangement where pieces vary in size and placement. Both styles look beautiful — it just depends on your personal preference.
Gather and Mix Different Frame Sizes
For a dynamic and eye-catching look, mix different frame sizes and orientations. Combine small, medium, and large frames for variety. You can use matching frames for a clean, uniform look or mix different styles and finishes for a more eclectic vibe. Including unique elements like mirrors, wall hangings, or decorative plates can add texture and interest to your gallery wall.
Plan Your Arrangement on the Floor First
Before committing to nail holes, lay all your pieces out on the floor to experiment with different arrangements. This step allows you to visualize the overall composition and adjust the spacing between frames. Take a photo of your favorite arrangement so you can easily replicate it on the wall.
Measure and Mark for Perfect Placement
When you’re ready to hang your frames, start by marking the center point of your gallery wall and work outward. Use a measuring tape, level, and painter’s tape to mark where each frame will go. Keeping the frames at eye level (about 57-60 inches from the floor to the center of the gallery) creates a balanced and professional look.
Maintain Consistent Spacing
Whether you prefer a tight arrangement or a more spacious display, consistent spacing between frames is key to a polished gallery wall. A general rule of thumb is to leave 2-3 inches of space between each frame, but you can adjust this depending on your wall size and frame dimensions.
Add Personal Touches
Your gallery wall should tell a story about you. Include pieces that hold personal meaning — family photos, artwork from your travels, inspirational quotes, or even your child’s drawings. These personal touches will make your gallery wall feel authentic and uniquely yours.
Final Thoughts
Arranging a gallery wall might seem intimidating at first, but with a little planning and creativity, it’s a rewarding and fun home decor project. Whether you choose a symmetrical grid or a playful, mixed arrangement, the key is to create a display that reflects your style and makes you smile every time you walk by. So gather your favorite frames and prints, and start building a gallery wall that turns your house into a home.